.svg)
Solutions
Features
Resources
Trusted by 2,000+ operators
"Whether you have a smaller listing count or a larger one, Uplisting is easy to use, and it's scalable."
Josh Kristoff
Nomad Capital Adventures

4.8/5

4.9/5
Log in to your account
"Whether you have a smaller listing count or a larger one, Uplisting is easy to use, and it's scalable."
Josh Kristoff
Nomad Capital Adventures
Log in to your account

A structured Airbnb onboarding process prevents costly mistakes and delays.
First impressions with guests and owners begin before the listing goes live.
Clear documentation and checklists keep every property consistent.
Imagine this: a guest books your place, but when the day comes, they’re circling the block looking for parking, can’t figure out how to get inside, and their messages go unanswered for hours. By the time they finally walk through the door, they’re already frustrated—and you’re left dreading the review.
That shaky start is what a clear onboarding process is designed to prevent.
Done right, an Airbnb setup checklist smooths out all the small details before the guest even arrives. From how to find the front door to what time checkout really means, it sets expectations, builds confidence, and saves you from late-night calls about Wi-Fi passwords.
In this blog, we’ll cover 5 steps to create a smooth Airbnb onboarding process, including practical ways to keep guests comfortable, reduce mix-ups, and set the stage for great stays and stronger reviews. From gathering key details to testing automation before going live, each step is built to save time and reduce manual work.
The way you onboard a property often decides how everything runs later, including bookings, guest reviews, even how often your phone rings with avoidable issues. A clear Airbnb onboarding process sets the tone for how every stay operates, from the first guest message to the final clean.
When the setup feels rushed, problems show up fast. Listings with missing details or unclear photos sink in search results. Descriptions that leave too many questions lead to more guest messages and fewer bookings. When check-in instructions are vague or cleaning schedules aren't locked in, those precious five-star reviews start slipping away.
Our top tip? What looks like a shortcut early on usually turns into more work later, so it's worth taking the time to figure out the Airbnb onboarding process from the get-go. Here are our expert-vetted 5 steps to getting your onboarding process off to the best of starts.
Automated guest messages keep your guest informed from booking through to check-out. They’re designed to answer questions before they arise, saving you time whilst keeping your guests happy.
Every new listing starts with getting the details right.
Begin with legal and ownership details. If you don’t own the property, collect the owner’s full name, phone number, email address, and a written outline of your responsibilities. In cities with short-term rental regulations, get copies of the rental license, safety inspection, tax registration, and anything else local authorities require. Skipping these steps can delay your listing or even get it removed.
Once compliance is handled, shift to the physical details. Create a room-by-room inventory: square footage, bed types, mattress sizes, Wi-Fi speed, number of bathrooms, and whether each has a shower, tub, or both. List amenities clearly.
Photos matter more than anything else on the page. Skip the blurry phone shots and schedule a walk-through with a camera that captures the space accurately. Take wide-angle photos in landscape format with natural light. Include every room and don’t forget small but relevant spots like parking areas or laundry rooms.
Some properties come with quirks. A sticky lock, a step that’s easy to miss, a faucet that needs an extra push to shut off. Make a list and include anything a guest might struggle with or ask about later. Add instructions for things you’ll want them to handle on their own, like trash day, Wi-Fi resets, how to use the heater without setting off the smoke alarm.
Don’t skip over neighborhood rules either. Parking limits, quiet hours, pool access codes, these details shape the guest experience just as much as a clean kitchen or fresh sheets.
When it comes to your listing, every setting, description, and rule shapes how often your listing gets booked and how smooth each stay goes. A sloppy setup leads to more guest questions, more complaints, and more work for you later.
Describe the layout, how rooms connect, and what someone will find in each space. Mention the number of stairs. Note if parking is on the street or in a dedicated spot. Call out fast Wi-Fi, blackout curtains, or soundproof windows, details that help guests picture their stay.
Use language that speaks directly to your audience. If you're hosting business travelers, highlight the desk, ergonomic chair, and fast, reliable internet. If you're catering to families, point out the crib, blackout shades, and fenced backyard. Guests skim listings fast, so make every sentence count.
Not every rental fits every guest, and that’s a good thing. Highlight what makes the space ideal for the kind of traveler you want. Mention the walkable restaurants, the dedicated workspace, or the peace and quiet for remote workers. If the home sits off-grid with no cell reception, say so clearly. Some guests love that, but others don’t.
Think of the listing as your first filter. A clear description brings in guests who appreciate the space and know what to expect. That means fewer complaints and better reviews.
Default settings rarely match how a real short-term rental runs. Go through every option and adjust based on how you want things to work. Require government ID. Pick a cancellation policy that protects your calendar without scaring off guests. Only turn on instant booking if your calendar and team can handle the pace.
Clear rules help set guest expectations before booking ever happens and that’s where smoother operations begin.

Manage short-term rentals & bookings, message guests, take payment, and so much more. All in one easy-to-use platform (that never double-books).
A clean, stocked, and safe property sets the tone before anyone even finds the Wi-Fi password.
A quick wipe-down won’t cut it. Every surface needs attention, like under the beds, behind appliances, inside cabinets. Scrub grout, dust vents, and clean baseboards. If a hotel wouldn’t approve, keep cleaning.
Once the space is spotless, set it up like a guest is about to walk in. Fluff pillows. Fold towels neatly. Straighten art. Beds should look pressed and crisp, not like someone just rolled out of them.
Natural light works best for Airbnb photos, so open blinds and avoid harsh overhead fixtures. Hide cords, remove trash bins from the frame, and clear counters. Photos are your storefront so make every room count.
Guests shouldn’t have to guess where things are or run to the store after checking in.
Kitchens need enough to cook a basic meal—salt, pepper, oil, cookware, utensils, dish soap, and a sponge. Bathrooms should always have fresh towels, toilet paper, hand soap, shampoo, and body wash. If something runs out before checkout, expect a message.
Set out items guests often forget, like coffee, tea, and a power strip near the bed. Keep instructions for Wi-Fi, check-out, and trash pickup in one visible spot, on the fridge or a small binder on the counter works well. Include a short list of local restaurants, pharmacies, and emergency contacts so guests don’t need to dig through their phones.
Kitchen basics: Coffee, tea, oil, salt, pepper, cookware, sponge, dish soap
Bathroom supplies: Hand soap, shampoo, body wash, toilet paper, fresh towels
Helpful info: Emergency numbers, trash day, parking rules, Wi-Fi login
Nothing here needs to be fancy—just clean, complete, and reliable.
Before any guest books, run a full walkthrough with a safety mindset. Locks on all doors and windows should work smoothly, not stick, jam, or require a trick to open. Smoke and carbon monoxide detectors must be tested regularly, and fire extinguishers should be easy to spot and in working condition.
Appliances need more than a plug-in test. Heat the oven to confirm it reaches temperature. Run the dishwasher through a full cycle. Start the washing machine and watch for leaks. Even toasters and kettles should be clean and ready to go. If something’s there, it should work without explanation.
Walk through the home like a first-time guest. Can you find everything easily? Does the place feel safe, stocked, and ready? A strong Airbnb onboarding process depends on setting the property up to run without surprises—for you or the guest.
Once a listing goes live and the property is guest-ready, real work kicks in. Without smart systems in place, even a well-prepped Airbnb turns chaotic fast. Take the time now to get systems in place that you can rely on as your business scales.
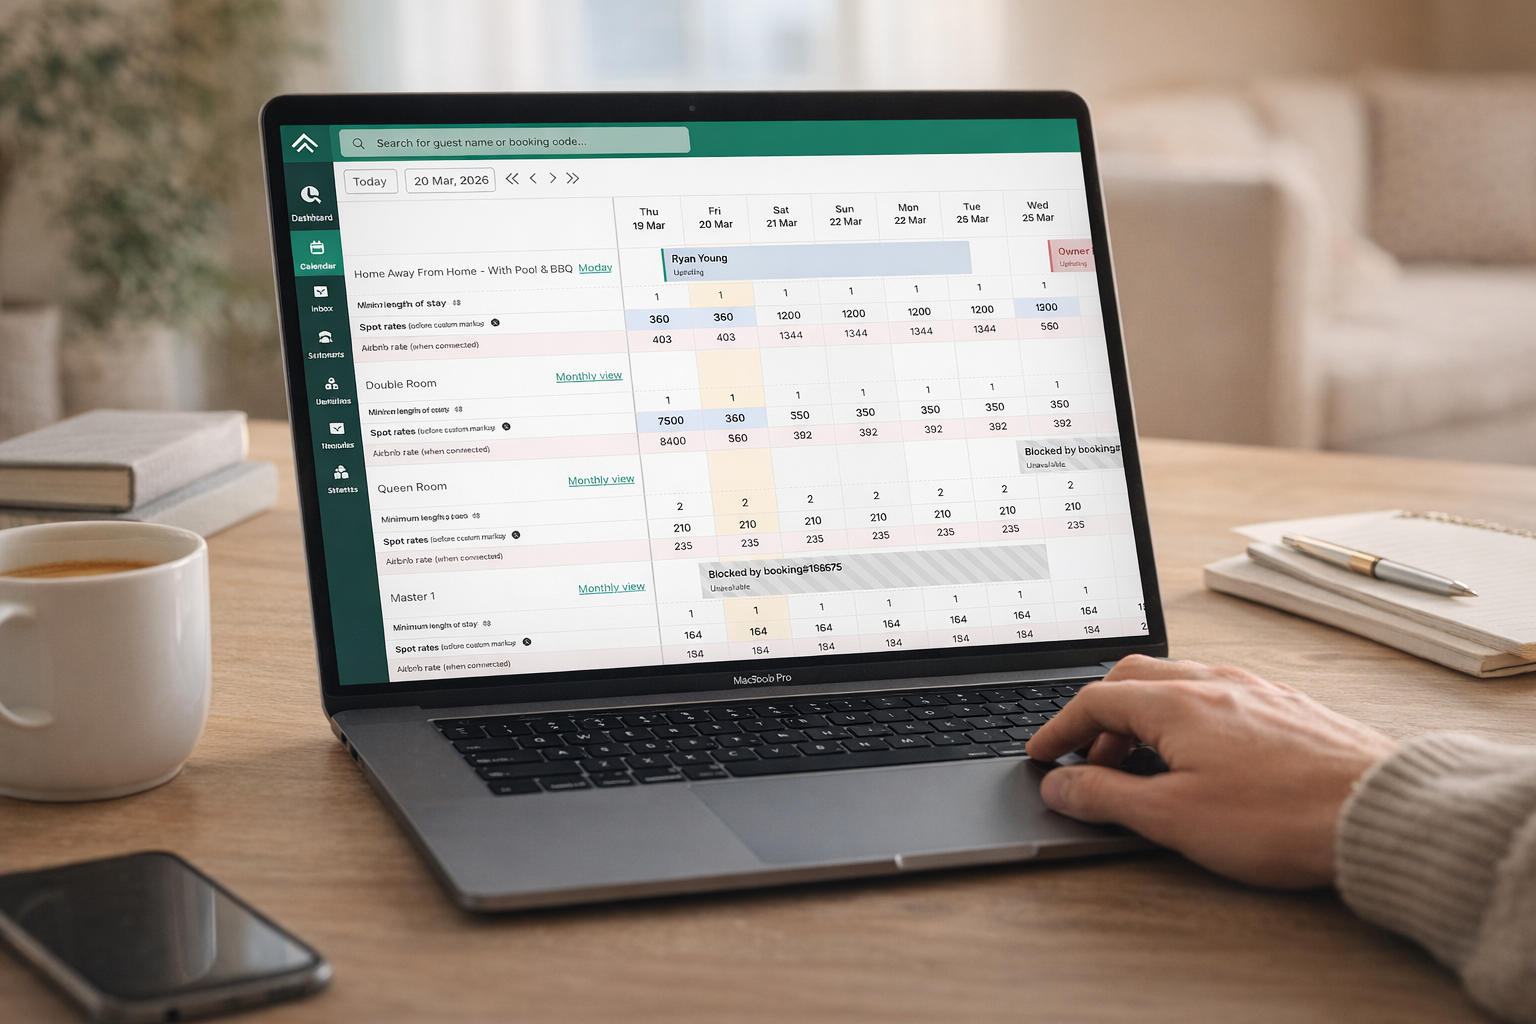
Manually juggling calendars and guest messages across platforms almost guarantees double bookings and missed check-ins. A property management system keeps everything in sync, like calendars, inboxes, and bookings, so you don’t have to.
For operators managing a handful of listings, the right setup cuts down on errors and hours of admin. Look for a system that automatically syncs availability across Airbnb, Vrbo, and any direct booking channels. It should also pull every guest message into one place, support automated replies, and block turnover time without needing a calendar reminder.
Guests expect all the right info before they need to ask for it. Automated messages cover the basics, keep communication consistent, and give guests peace of mind. Once the setup is in place, messages go out automatically at the right time, with no extra effort.
Here’s a simple messaging flow that works:
Pre-arrival message: Send 24–48 hours before check-in. Include directions, parking details, and access instructions.
Check-in message: Deliver on the day of arrival. Share lockbox codes or smart lock instructions, and note any tips for entering the property.
Mid-stay message: On day two of longer stays, send a short check-in. Something like “Hope everything’s going smoothly—let me know if anything’s missing.”
Check-out message: Send the night before departure. Remind guests of check-out time, where to leave keys (if needed), and thank them for staying.
Messages should be short, clear, and easy to reply to. Use the guest’s name. Mention something local. Keep it human. Once everything’s scheduled, it runs in the background without needing daily attention.
With Uplisting, you can send the right messages at the right time on all booking sites. Read and respond to guest messages in a single, unified inbox — whether you’re at the office or on the go.
Even the most organized setup can fall apart if you skip the final check.
Book your own listing or ask someone you trust to go through the process.
Use the same search terms, filters, and booking flow that a guest would. Pay attention to search visibility, the booking confirmation time, and message delivery. If anything feels clunky or creates questions, fix it before guests run into the same friction.
Open every scheduled message and quick reply. Read them line by line. Look for typos, outdated directions, or vague phrases that leave guests guessing. If a message mentions a keypad but you’ve switched to a lockbox, update it. If directions still reference a now-closed road, replace them with a better route.
Messages should feel helpful, not stiff. Make sure timing makes sense—arrival instructions should go out at the right moment, not hours too early or too late. Use clear language, and skip anything that sounds overly scripted. Guests should feel like someone’s already thought through their stay, not like they’re dealing with a bot.
Go to the property and follow your own instructions from start to finish. Arrive with luggage. Use the directions from your pre-arrival message. Try the lock. Walk in like you’ve never seen the place before.
Even small annoyances add friction to a stay. A fan with a noisy rattle might not seem urgent, but it could affect sleep and lead to a lower review. Catch issues now, before someone else points them out in a message or in a public comment.
No one notices when operations run smoothly but they definitely notice when they don’t. With a repeatable Airbnb onboarding process, you set every property up to run like it should, without more work on your end.
When onboarding is consistent and repeatable, you can scale without sacrificing quality. Whether you're managing two properties or twenty, the right process ensures reliability across every stay. With fewer manual tasks and fewer surprises, you’re positioned to grow faster and deliver a five-star experience every time.
Sign up for Uplisting to streamline your vacation rental management. Automate your onboarding, centralize your operations, and build a short-term rental business that runs smoothly, right from day one.
It’s simple to automate repetitive tasks with Uplisting's short-term rental software. You’ll save hours every week and eliminate human error. Go ahead — take some time off.
Starting out as a host can feel like a rush of checklists, forms, and photos. Below are the most common questions new operators ask when getting listings live and running smoothly. Each step in the Airbnb onboarding process plays a direct role in how fast you go live—and how well your listings perform once they’re up.
To get started, create a listing with clear property details—number of rooms, amenities, house rules, and nightly rates. Upload high-resolution, landscape photos and write a description that helps potential guests picture their stay. Airbnb also asks for ID verification, and in some cases, additional documents like proof of ownership or permission from the landlord. Keep both your personal info and property details handy during setup.
The setup itself only takes a few hours if the property is photo-ready and fully stocked. In areas with licensing or safety inspections, the timeline stretches to several days or even a few weeks. Most delays happen when waiting for city approvals, tax registration, or professional photography—not during the actual listing process. Once everything is in place, the listing can go live the same day.
Cities and counties often have specific requirements for short-term rentals. You’ll likely need a business license or short-term rental permit, proof of smoke alarms and carbon monoxide detectors, and documentation for local tax collection. Some jurisdictions also require public display of the registration number on the listing. Check with your local government or housing authority to avoid listing restrictions or fines.
Nearly everything can run on autopilot once the property is set up. Guest messaging, calendar syncing, pricing updates, and check-in instructions can all be scheduled and triggered automatically through a property management system. The only parts that still rely on you are upfront tasks like licensing, inspections, and staging the space. Once those are handled, the rest of the Airbnb onboarding process can run behind the scenes without constant oversight.
.png)